Support/
GBT
Machine
GBT Machine
Your Support for GBT Machine®️
Welcome to the GBT Machine®️ support page. Here, you'll find everything you need, from user guides, FAQs instructional videos and troubleshooting tips to get the most out of your device and all its consumables.
If the device is properly plugged in there might be an issue with the fuses.
If still not solved, contact EMS aftersales service.
Stop using your device immediately, disconnect the main plug and contact EMS aftersales service.
/!\ First disconnect the mains plug.
This symptom is generally caused by a problem to the pressure regulator (fault or low temperature) or by a crack in the water bottle.
1. Stop using your device immediately and disconnect it from the grid.
2. Check the bottle in use for crack or any damage and, if the case, replace it with a new one.
3. Check the supplied air pressure: it shall be 4.5 bar minimum. 6 bar ideally.
4. If the device temperature is below 10°C (device too cold), wait for it to warm-up at ambient temperature and then reconnect to the power grid and switch it on again.
5. If the device temperature is over 10°C, or the problem recurs, definitively stop using it and contact EMS aftersales service.
2) Clean and dry the male and female electrical contacts (mini-jack) of the PIEZON® handpiece cord system
2) Clean and dry the male and female electrical contacts (mini-jack) of the AIRFLOW® MAX handpiece cord system
2) If it is the case, check that this handpiece is correctly connected to the handpiece cord connector.
3) If the logo RFID/NFC is missing, you can use your EMS handpiece but you will be restricted in connectivity. Contact your EMS representative for further assistance and information.
Contact your Aftersales Service Center without delay.
The maintenance key symbol will light up and fade several times. This step may take between 10 seconds and 3 minutes, depending on the update performed.
NB: If you want to skip this step, touch the ON/OFF button on the calliper. The next time you turn ON your device, this update will be requested again.
2) If it is the case, check that this handpiece is correctly connected to the handpiece cord connector.
3) If the logo RFID/NFC is missing, you can use your EMS handpiece but you will be restricted in connectivity. Contact your EMS representative for further assistance and information.
2) Open your EMS interface to select the right network and enter the password.
Please refer to IFU (FB-1022) section “2.5.1 - Connecting / Disconnecting from the Wi-Fi” for more information.
NB: If you want to skip this step, touch the ON/OFF button on the calliper
Caution: Risk of fire and electric shock.
1) Disconnect the mains plug and stop using your device immediately
2) Wait for 30 seconds, then plug it back in again and restart the device
3) Disconnect again the mains plug and wait for 1 hour, then plug it back in again and restart the device
If still not solved, contact the Aftersales Service Center.
If the issue persists, you may need to replace the powder chamber or the bottle lid. Please contact EMS after-sales service.
If the issue persists, replace the powder chamber or bottle lid with a new one, or contact EMS Aftersales service.
If the powder chamber pressurizes:
The handpiece may be clogged. Follow the maintenance process to prevent or unclog the handpiece by watching the video in the maintenance chapter.
Go to the MAINTENANCE section and select "How to reprocess and prevent clogging on the AIRFLOW® MAX handpiece?"
If the powder chamber does not pressurize, there are two possibilities:
The issue occurs with both powder chambers:
The air pressure may not be sufficient. Check if the compressor is on and if the device is correctly connected. If necessary, contact your technician to check the air pressure.
The issue does not occur with both powder chambers:
The powder may be stuck inside the chamber. Try the following steps:
Shake the powder chamber properly before use.
If this doesn’t help, remove the powder from the chamber, dry it using compressed air, and add new powder.
If the issue persists, perform a complete cleaning of the powder chamber. Follow the maintenance process by watching the video in the maintenance chapter.
Go to the MAINTENANCE section and select "How to clean the powder chamber?
1. Follow the maintenance process to prevent or unclogg the handpiece by watching the video on the maintenance chapter. Go to MAINTENANCE section and select How to reprocess and prevent clogging on AIRFLOW® MAX handpiece?
If the unclogging of the handpiece doesn't fix the issue it may indicate a clogged AIRFLOW® cord.
2. Dismount and clean the AIRFLOW® cord extremity.
3. Blow with compressed air through the one end and then repeat fro the other end. If there is no air coming out, the AIRFLOW® cord is clogged.
If still not solved, contact EMS aftersales service.
2. Remove the excess powder above the MAX sign on the bottle.
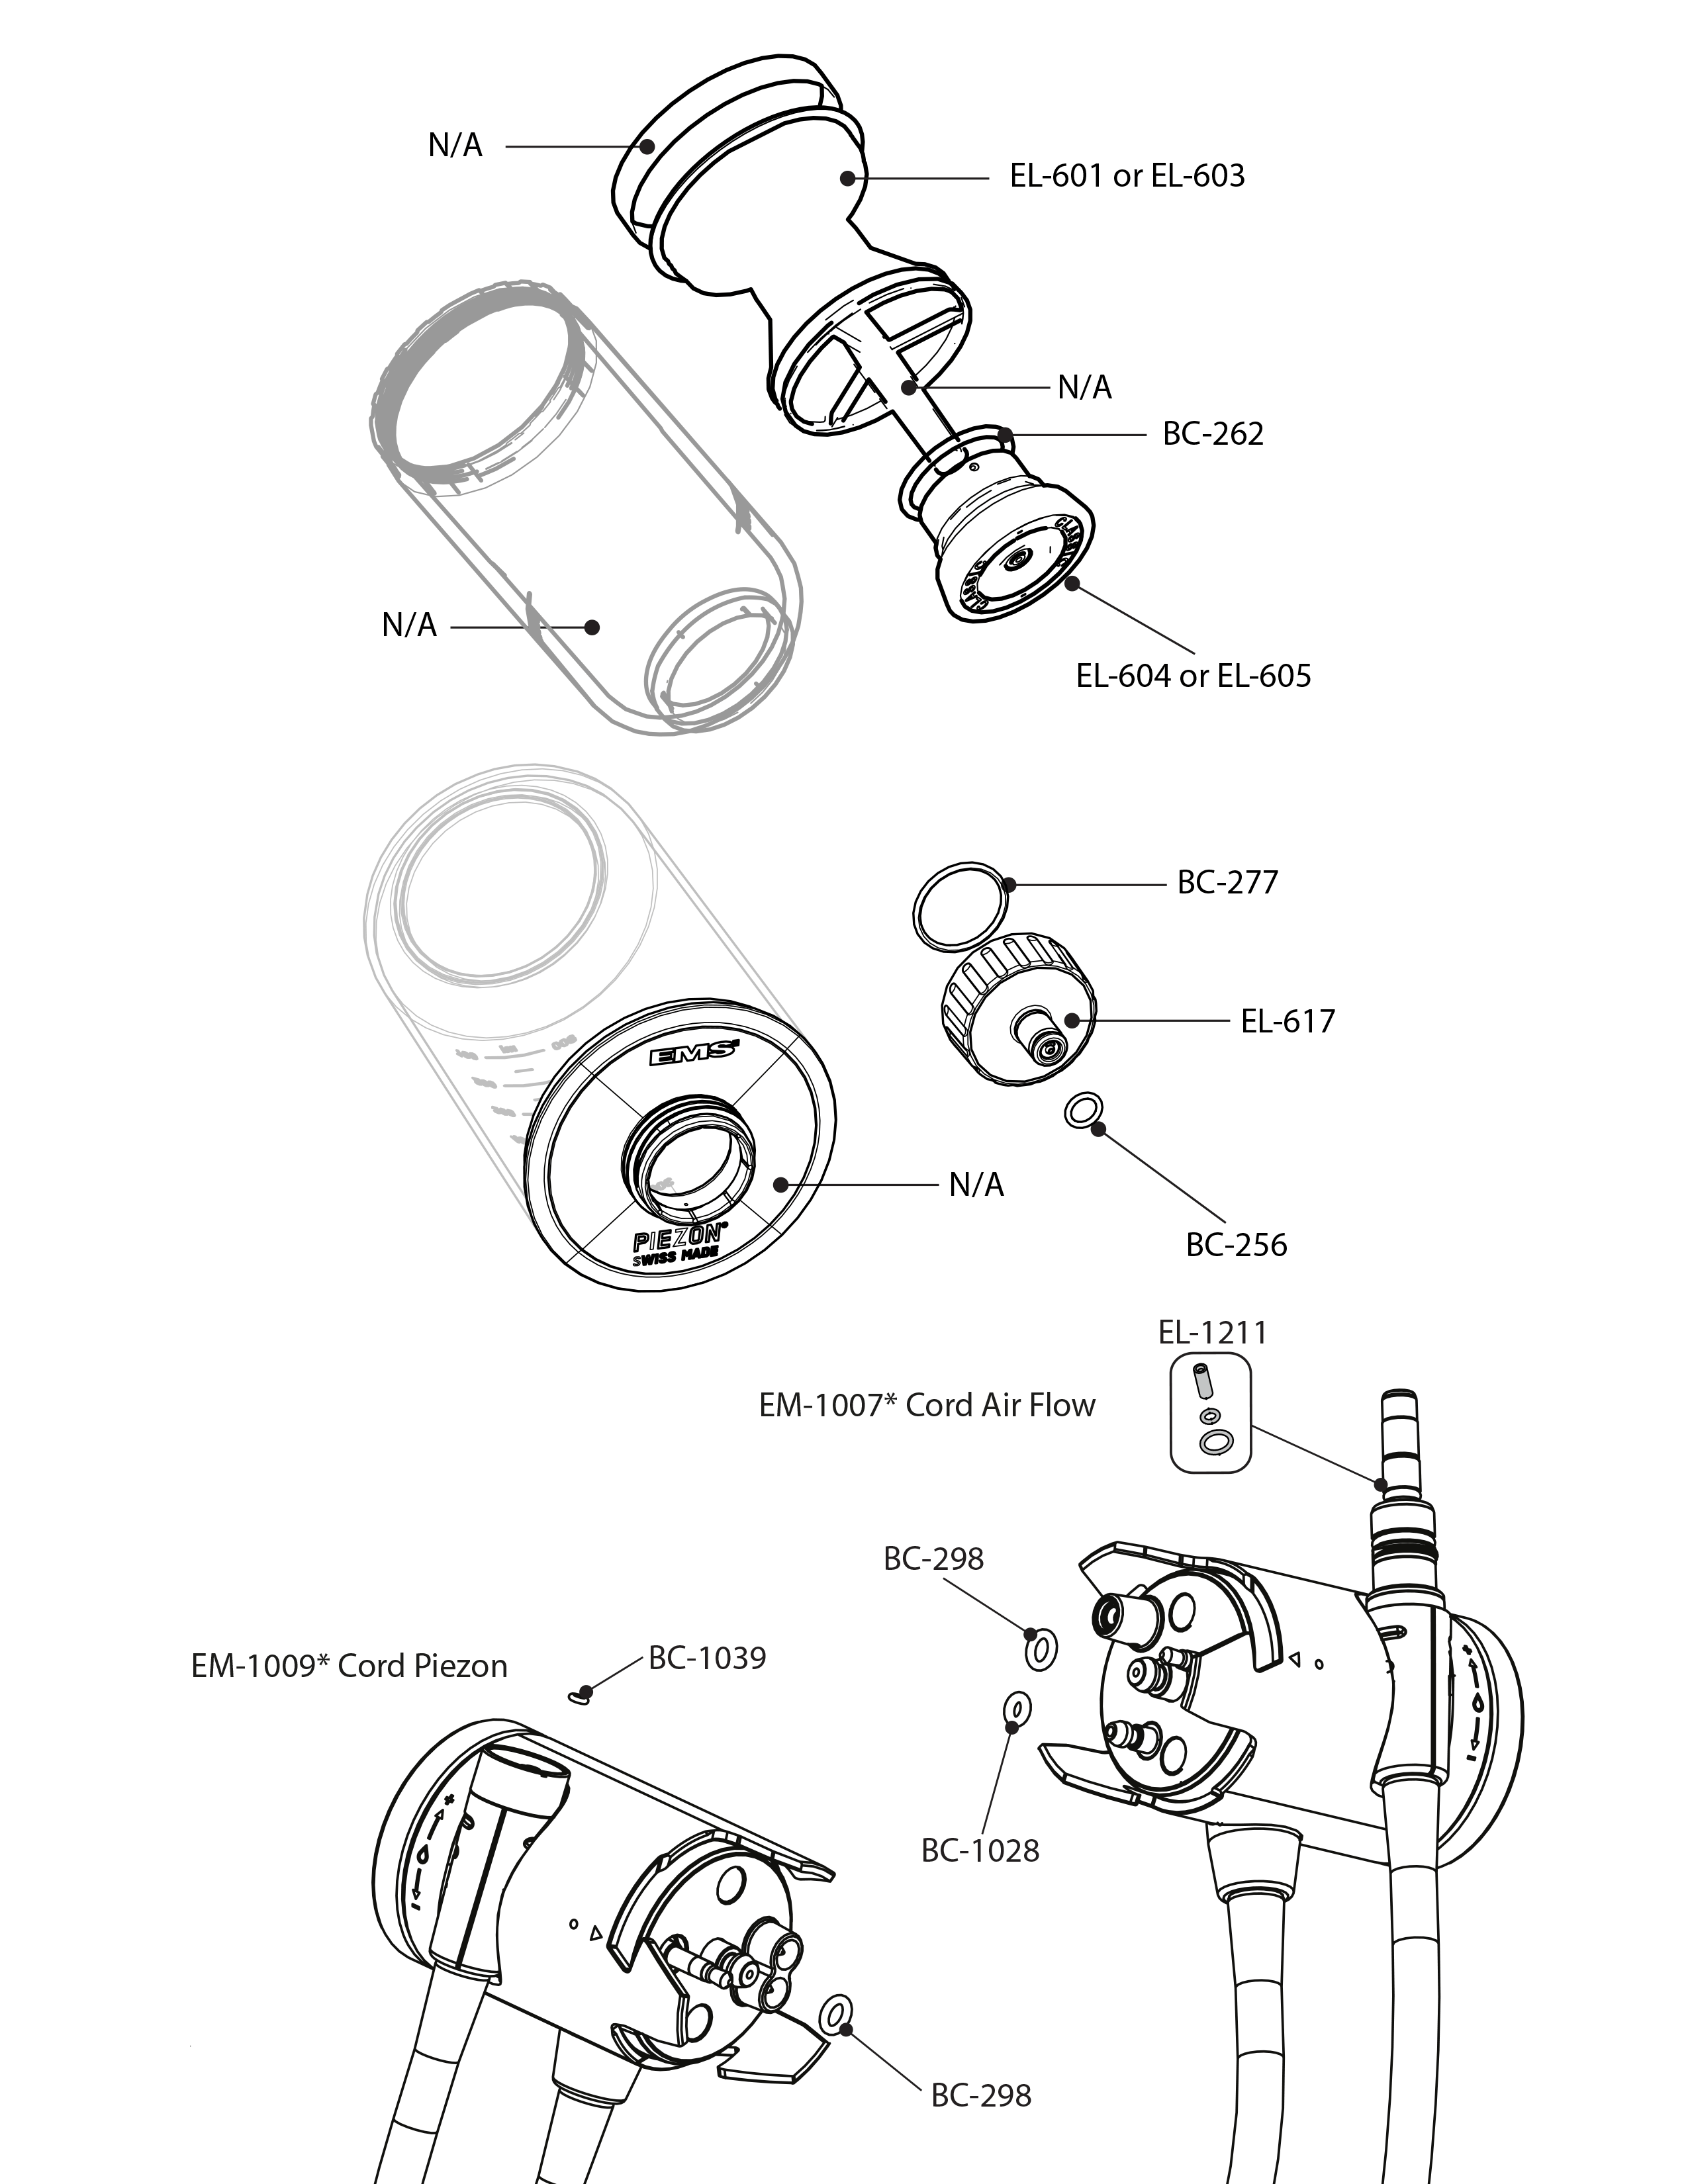
3. Check if the small seal on the powder chamber lid is worn out. If necessary, replace the lid or the large seal (BC-262 for the lid). If the issue persists, contact EMS after-sales service.
1. Check the air line for no kinking and check the air compressor unit. Air compressor should delivered 4.5 bar pressure, 6 bar ideally.
2. Check air filter for cleanliness and replace if dirty.
If still not solved, contact EMS aftersales service.
2. Make sure you have well-connected cords and sufficient pressure (air pressure: 4.5 to 7 bar. Ideally 6 bar. / water pressure: 2 to 5 bar)
3. Perform a second rinsing phase before treatment. If still not solved, contact EMS aftersales service.
Clean the connection points on both the cap and the device.
If the bottle is still leaking, inspect the bottle and cap for any cracks.
If the bottle is damaged, replace it. If the issue persists, contact EMS after-sales service.
Under the device, move the lever towards yourself and remove the black part (connector) of the cord.
Check the connector for dried Night Cleaner. If any residue is present, clean it.
For PIEZON® only: Check the pins on the connector and the handpiece. If the pins on the cord are oxidized or contain Night Cleaner residue, clean them or replace the cord.
Disconnect the cord, clean the air jack, and reconnect it.
If the issue persists, contact EMS after-sales service.
It may be time to replace the O-rings.
Turn off the device.
Under the device, move the lever towards yourself and remove the black part (connector) of the cord.
Check the condition of the O-rings.
If the O-rings are worn out, contact EMS after-sales service to obtain replacements.
If the O-rings are intact, the cord may not be properly connected. Check the cord connections.
If the issue persists, contact EMS after-sales service.
For the AIRFLOW® cord:
If there is leakage at the connection between the AIRFLOW® Handpiece and the AIRFLOW® cord, replace the O-rings on the cord using the spare provided in the EL-1076 Kit, located in the AIRFLOW® application box.
Follow the maintenance process by watching the video in the maintenance chapter.
Go to the MAINTENANCE section and select "How to change the O-ring of the AIRFLOW® cord?"
For the PIEZON® cord:
If there is leakage at the connection between the PIEZON® Handpiece and the PIEZON® cord, replace the O-rings on the cord using the spare BC-083, provided in the PIEZON® application box.
Follow the maintenance process by watching the video in the maintenance chapter.
Go to the MAINTENANCE section and select "How to change the O-ring of the PIEZON® cord?"
If the issue persists, contact EMS after-sales service.
If this is not the case, the problem may have multiple causes, requiring a step-by-step check:
1. Turn off the device, disconnect and reconnect both the AIRFLOW® and PIEZON® cords, then try again.
2. Perform a new pairing by following the video in the maintenance chapter, then try again.
3. Replace the 2x AA lithium batteries, then perform a new pairing by watching the video in the maintenance chapter.
Go to the GET STARTED section and select "How to pair the wireless pedal with the GBT Machine®?" Then, try again.
If the issue persists, contact EMS after-sales service.
Make sure you are using lithium batteries.
If the issue persists, you may need to re-pair the foot control with the unit. Perform a new pairing by watching the video in the maintenance chapter.
Go to the GET STARTED ection and select "How to pair the wireless foot pedal?
If the issue is still not resolved, contact EMS after-sales service.
2) Problem could come from worn-out o-ring on PIEZON Cord.
3) Problem could come from residuel humidity within the Handpiece, it is recommanded to sterilize it.
If still not solved, contact Aftersales Service Center.
1. Check the condition of the nozzle.
2. Replace the handpiece if necessary.
PERIOFLOW® Handpiece
1. Replace the nozzle and check its fit.
2. If the PERIOFLOW® Nozzle does not hold properly or is not watertight, contact EMS after-sales service.
PIEZON® Handpiece
- If the PIEZON® Handpiece falls on the PIEZON® Instrument, replace the PIEZON® Instrument.
- Check the condition of the nozzle.
- If the PIEZON® Handpiece does not function properly or if you have any doubts, contact EMS after-sales service.
2. The PIEZON® Handpiece LED may have switched off due to activity time-outs:
- After 10 minutes of continuous operation.
- After 20 seconds of inactivity while off the holder.
In both cases, place the handpiece back into the holder, wait 1 minute, and try again.
If the issue persists, contact EMS after-sales service.
2. Replace the PERIOFLOW® Nozzle.
3. Check for any residues between the PERIOFLOW® Nozzle and the handpiece.
4. Ensure that nothing is affecting the alignment of the PERIOFLOW® Nozzle.
If the issue persists, contact EMS after-sales service.
For AIRFLOW® or PERIOFLOW® handpieces:
If there is leakage at the connection between the AIRFLOW® or PERIOFLOW® Handpiece and the AIRFLOW® cord, replace the O-rings on the cord using the spare provided in the EL-1076 Kit, located in the AIRFLOW® application box.
Follow the maintenance process by watching the video in the maintenance chapter.
Go to the MAINTENANCE section and select "How to change the O-ring of the AIRFLOW® cord?"
For the PIEZON® handpiece:
If there is leakage at the connection between the PIEZON® Handpiece and the PIEZON® cord, replace the O-rings on the cord using the spare BC-083, provided in the PIEZON® application box.
Follow the maintenance process by watching the video in the maintenance chapter.
Go to the MAINTENANCE section and select "How to change the O-ring of the PIEZON® cord?"
If the issue persists, contact EMS after-sales service.
Ensure that the handpiece is completely dry before sterilization.
If the light remains weak, replace the handpiece. Contact EMS after-sales service.
2. If the ring is too loose, replace it with a new one. Pay close attention to how the O-ring is installed—the flat side should face the base of the cord, while the round part should face the tip of the nozzle.
Follow the maintenance process by watching the video in the maintenance chapter.
Go to the MAINTENANCE section and select "How to change the O-ring of the AIRFLOW® cord?"
AIRFLOW® Handpiece
1) Verify that the handpiece is not clogged by removing it and checking the water flow without Handpiece. If the Handpiece is clogged, follow the maintenance process to prevent or unclogg the handpiece by watching the video on the maintenance chapter. Go to MAINTENANCE section and select How to reprocess and prevent clogging on AIRFLOW® MAX handpiece?
2) Check your water filters cleanliness and replace it if necessary. Disconnect the mains plug before servicing any filter.
3) Make sure you have well-connected and sufficient pressure from your water supply. If still not solved, contact Aftersales Service Center.
PERIOFLOW® Handpiece
1) Change the PERIOFLOW Nozzle
2) Remove the PERIOFLOW Nozzle and verify that a water jet comes out of the handpiece. If still not solved, contact Aftersales Service Center.
To register a device, please create a MyEMS account. By registering, you can not only keep track of your registered devices, but also unlock a host of exclusive features and resources. Gain access to comprehensive guidelines, stay informed about the remaining warranty period, explore interactive content and manuals in our media centre, and discover the latest research and findings in our scientific library. Haven't registered yet? Create your MyEMS account now!
- Switzerland
- Germany
- France
- Spain
- Portugal
- United Kingdom
- Sweden
- Poland
- Jordan
- United States
- Australia
- Japan
- China
- South Korea
- Italy
- Czechia
- Slovakia
- Russia
ELECTRO MEDICAL SYSTEMS SA
Chemin de la Vuarpillière 31
CH - 1260 Nyon
T. +41 22 994 47 21
email: ssav@ems-ch.com